
I. Introduction
During the development of single-chip software, the various problems encountered in software debugging often make beginners feel overwhelmed. Actually. The basic methods and techniques of program debugging for various simulation development software are similar, and master the basic skills of correct program debugging. For the troubleshooting of these procedural errors, you can play the opposite role and get twice the result with half the effort. Software debugging is an important basic skill that must be mastered by microcontroller technicians.
The following is an example of the commonly used development software Keil of the single-chip microcomputer. The method of simulation and debugging of the single-chip software is introduced through a project task example.
Second, Keil simulation and debugging
Click on the running software Keil uVision2. The debugging steps can be roughly divided into 5 steps:
1. Create a project
In project development, not only one user source program is enough, but also the CPU model, setting compilation and debugging parameters for this project. Some projects also have multiple files. Therefore, these parameter settings and all required files are collectively referred to as a project and stored in a dedicated project folder. Here first create a project folder such as F:\exam.
1 Create a new project. Left mouse click on the main menu Project > New Project. Create New Project" dialog box, use the mouse to select the folder where you want to save the project (such as FAexam), enter the new project name (such as "exam"). Click the "Save" button.
2 In the CPU Model Settings dialog box that pops up, select the model of the microcontroller (such as "AT89C51") and click "OK" to complete.
2. Create source files and join the project
1 Left mouse click on the menu. File > New file.
The window of Figure 1 pops up. Automatically enter the editing mode.
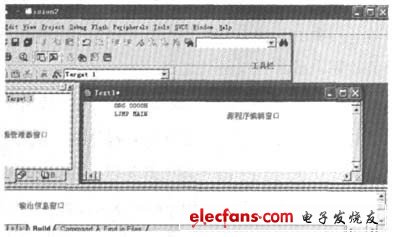
Figure 1 Source file creation and editing
2 Enter and edit the user's source program in the text window.
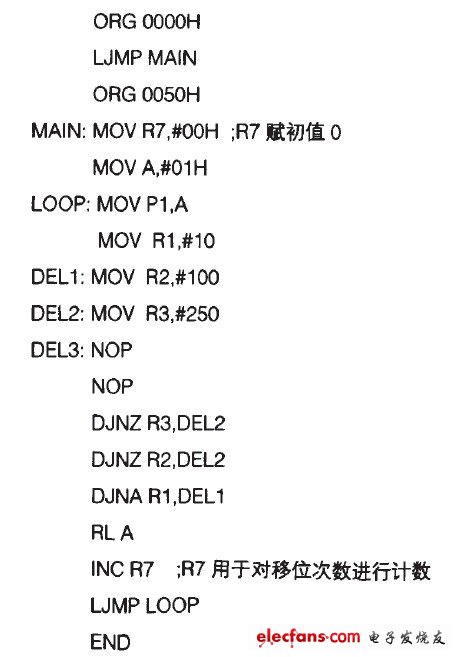
[Project Task] Design a pattern lantern program to realize the eight LEDs connected to the P1 port of the single-chip microcomputer to circulate in turn.
3Click the menu. File one>Save as. Popup file save dialog box, select the project folder ("F:\exam"). Enter the source file name (eg "exam.asm") and click the "Save" button.
Note that the extension of the assembler source must be asrn, and the C51 source extension must be *.C.
4 Add the source program to the project. Use the mouse to click the "+" sign in front of the icon "Target1", expand it and right click on the Source Group pop-up shortcut menu, click on the "Add File to Group'SourceGroup 1" item to pop up the source program to join the project dialog. Select the user source program exam.asm you just saved, click the ADD button to join the project, and click Close to close the dialog box.
Smd Speaker,Smd Subwoofer,Mini Smd Speaker,Smd Piezo Speaker
NINGBO SANCO ELECTRONICS CO., LTD. , https://www.sancobuzzer.com